Scheduler overview
The Scheduler has simple and advanced features to arrange appointments with students. The simple features allow one teacher to schedule time with individual students, such as office hours. The advanced features allow appointments to be:
- Offered with a choice of teachers in a single class
- Arranged with groups of students
- Changed for the time, number of students, and more
Contents |
Requirements
The requirements listed below apply to all the instructions for the Scheduler.
- The Moodle Scheduler must be installed, since it is not part of the core Moodle package.
- Teachers and students must be enrolled in the course.
- You must have teacher access to a Moodle course.
- You need to be familiar with basic skills for adding content to Moodle, such as turning editing on and adding an activity.
- If any of the requirements above are not met, contact your Moodle Support Team.
Scheduler quick start
The scheduler has many features. This section describes how to quickly make a simple scheduler, so only the basics are described. After making a simple scheduler, you can make changes to it or decide which additional features you need to learn, in future schedulers.
- Click Turn editing on > Add an activity or resource.
- In the list that appears, click Scheduler > Add.
- A webpage will appear for a new scheduler, with a name field at the top. Type a name for this scheduler, such as “Term 1 Office Hours.”
- Scroll to the bottom of the page and click Save and display.
- A webpage will appear with the name of your scheduler at the top. Click Add slots.

- In the drop-down menu that appears, click Add repeated slots.
- A webpage will appear with options to add time slots, complete these options to represent when students can arrange an appointment. At first, you should only need to use the following fields: Date, Start time, and End time. Slots can be changed, added, or removed later.
- Scroll to the bottom of the page and click Save changes.
You may need to adjust some of the time slots just created, which is described next.
Changing time slots
You change time slots in the My appointments or All appointments section of a scheduler.
If either is not currently visible, use the instructions below.
Accessing “My appointments” and “All appointments”
You will frequently use the My appointments or All appointments area when using a scheduler. To reach either, view the appropriate Moodle course and then click the scheduler you want to work with.
A page will appear containing My appointments and All appointments, although All appointments may not be accessible. Users with teacher access can view All appointments under two conditions:
- More than one teacher is enrolled in the Moodle course.
- The user with teacher access is assigned to slots in a scheduler.
Users with administrative access to a course can always view All appointments. For the sake of simplicity, these instructions only refer to My appointments when the same features are available in All appointments.
Changing individual slots
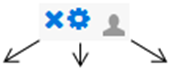
After slots have been added to a scheduler, they are displayed in My appointments. Each slot has three icons on the right, described in the following table.
 |
||
 |
 |
 |
|
|
|
After a student is assigned to a time slot, a fourth icon will appear next to the student’s name, which is  . Click the thumbs-down icon to revoke the student from the time slot.
Changing multiple slots
There are two actions that can be applied to multiple slots. One is adding multiple slots, which is described in the Scheduler quick start above. The other is deleting slots, described below.
- View the My appointments area for the scheduler containing the slots you want to delete.
- Click Delete slots.

- A list will appear with options for deleting slots, click the option that works best for you.
Implementing a scheduler
After you have created a scheduler, there are several options for modifying it, adding students, and managing the slots they select.
Students selecting time slots
After a scheduler is available for students, each student can use the steps below to select a time slot.
- View the Moodle page containing the scheduler.
- Click the scheduler.
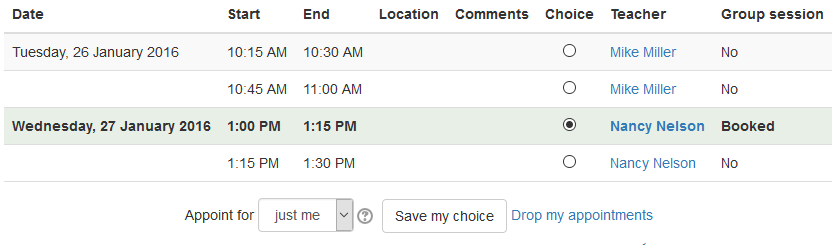
- Select a time slot from list that appears.
Note
If no appointments are available, a message will appear stating, “No appointment required, or all the announced appointments are complete.”
- Click Save my choice.
- After saving a choice, confirmation will appear, as shown below. A new link will also appear called Drop my appointments, for the student to remove appointments from this specific scheduler.
A student can also reserve an appointment for a group that he or she is part of. That procedure is described in the section Scheduling student groups.
Teachers assigning time slots for students
Teachers or administrators can also assign students to a time slot.
- View My appointments.
- Click Schedule, to the right of the student’s name.
- Select Schedule in slot.
- A webpage will appear with many options. Click Choose existing, at the top of the page.
- Select an existing slot for the student’s appointment.
- If no slots remain or if you want to create a new slot for the student, complete the form below the Schedule in slot drop-down menu.
- Click the Save changes button.
Adding comments & notes
The procedures for adding notes and comments are similar, but the purpose for each is different, shown in the following table.
| When Used | Who Can View | |
| Comment | Before an appointment | All teachers & students |
| Note | After an appointment | All teachers & only the student(s) assigned to a slot |
To add a note or comment to an appointment:
- Go to the My appointments area.
- Click the gear/cog icon
 for the appointment.
 - Scroll to the bottom of the page and type the comment or note.
- Click the Save changes button.
Advanced scheduler features
Advanced features combine basic procedures or work with features outside of the Scheduler, such as Moodle’s grouping tool. In this case, the steps in this section may require you to refer to preceding sections on this webpage or other parts of Moodle Docs.
Changing scheduler features and defaults
There are several features that can be changed for a scheduler. Some are the name, description, default slot duration, grades, visibility, and how groups are managed. To view what can be changed or make changes:
- View the Moodle course containing the scheduler.
- Click Turn editing on.
- Normally, you click on the name of a scheduler. In this case, click Edit, on the right of the scheduler.
- Select Edit settings.
Adding grades
By default, grades are not assigned to a scheduler, but this setting can be changed, when making a scheduler or after it is made. The steps below show how to add grades after making a scheduler, but the webpage for adding grades is the same if you add grades when creating a scheduler.
- View the settings page for the scheduler, as described above in Changing scheduler features and defaults.
- Click Grade and select Point.
Optional choice
In the Grade menu, there is also an option called Scale. These instructions recommend using Grade because it is often simpler. Choosing Scale requires you to work with Moodle’s grading scales, such as the one called Separate and Connected ways of knowing.
- In the field Maximum points, type the number of points available.
- Click Save and display.
Grades can now be added to the scheduler using Moodle’s standard gradebook feature, located in the Course administration block.
Scheduling student groups
The scheduler has a few options to work with student groups. You can change existing slots to allow multiple students, create many slots that allow multiple students, and use Moodle’s built-in group feature. Each is described below.
Changing existing slots to allow multiple students
When you add new slots, the default setting is that one student can select each slot. This setting can be changed to allow more than one student to select a slot, as described below.
- View My appointments for the scheduler that will be used for groups.
Optional Method
At this point, you could click the person icon to change a slot from exclusive, which allows just one student, to groups. After clicking the icon, it will change from one person to two, and the groups option will be active for the time slot. However, the number of students who can sign up for the time slot will be set to unlimited, which can cause scheduling problems. Continue with these instructions to set the number of students to a smaller number.
- Locate a time slot you want to change and then click the gear/cog icon
 , to the right of the slot.
 - On the settings page that appears, click Allow multiple students per slot.
- Select the number of students allowed for the slot.
- Click the Save changes button.
Adding multiple slots to allow multiple students
A quick way to prepare slots for student groups is to add multiple slots that allow more than one student. This process is similar to the Scheduler quick start, which also uses multiple slots. The only change needed to that procedure is to click Allow multiple students per slot and select the number of students needed. This change can be done just before clicking Save and continue, which is at the end of the quick start.
Increasing the number of students in a slot may address the needs for student groups, but there are some disadvantages. One is that students from any group can select a slot, so it’s possible for students from different groups to select the same slot. Another problem is that all students from a group need to be individually assigned to a slot, instead of assigning an entire group to a slot at once. If these issues are a problem, Moodle’s built-in group feature may be a better option.
Using Moodle’s groups with the scheduler
Moodle’s built-in groups feature adds some complexity to the Scheduler, but the groups feature also has important benefits. For example, entire groups can sign up for a time slot instead of individuals, and once a slot is selected by one group, other groups can be prevented from selecting it. For more information about Moodle’s group feature, read the detailed description of it. The rest of this section describes how that group feature affects the Scheduler.
Time slots for groups need to allow multiple students to select the slot, instead of the default setting of one student per slot. Specifically, the number of students allowed in a slot should be the same as the number of students in the largest group. Changing that setting was described, in the sections listed below.
- Changing existing slots to allow multiple students.
- Adding multiple slots to allow multiple students.
After the two conditions below are met, groups can select a slot or a teacher can assign groups to a slot.
- Groups have been created using Moodle’s grouping feature.
- Group slots have been configured to allow the correct number of students.
The remaining steps are similar to using a scheduler for individual students. When you view the My appointments area, student groups are listed next to individual students, with the same Schedule link to the right of each name. Clicking that link allows entire groups to be added to a slot in the same way that individual students are added.
If it is better to have groups select their own slot, one student in the group should follow the steps below.
- View the scheduler with group slots.
- Select the time slot the group wants.
- The student must click Appoint for, which is under the slots.

- The option just me will appear followed by the group(s) the student is a part of. The student should click the appropriate group name and then click Save my choice.
Working with multiple teachers
When there are two or more teachers in a course, each teacher has the same abilities with the scheduler that exit when there is just one teacher. In addition, each teacher can view and edit any scheduler options for another teacher, in the Moodle course. For example, one teacher can add a student to a time slot for another teacher or even cancel a student’s appointment for another teacher.
This flexibility can be helpful when teachers work together in a single class. If this flexibility causes problems, teachers should communicate with each other and create guidelines for what should or should not be done the scheduler, just like teacher create other guidelines for working together. If this option is not sufficient, another option is described next.
Working with an administrator & multiple teachers
Occasionally, an administrator will arrange meetings for teachers or teaching assistants. In this case:
- Both groups can be considered teachers, for the sake of the scheduler.
- The administrator can create the scheduler(s), so no teachers may need to create a scheduler. In this case, the teachers may only need a non-editing teacher role in the Moodle course.
- For an administrator to work in this role, he or she should:
- Have teacher access to a Moodle course.
- Learn when the teachers are available.
- Create the scheduler.
- Ask students to make an appointment.
With an administrator in this role, teachers simply monitor which students sign up for their time slot(s). Of course, many variations are possible, such has having some teachers who have editing access to a Moodle course and some who do not.
Recent Comments